Sharing Data
One of the most helpful features of LabArchives is its ability to share data. You can share data with individuals in your lab or with collaborators.
Share Your Notebook with Team Members
As the Notebook Owner, you can share anything from a single entry to the entire notebook with other team members. You can also setup custom permissions and rights in the notebook. By default, only the Owner can see the content in the notebook until other members are invited to the notebook. Each notebook member is assigned a role: Notebook Owner, Administrator, User, or Guest.
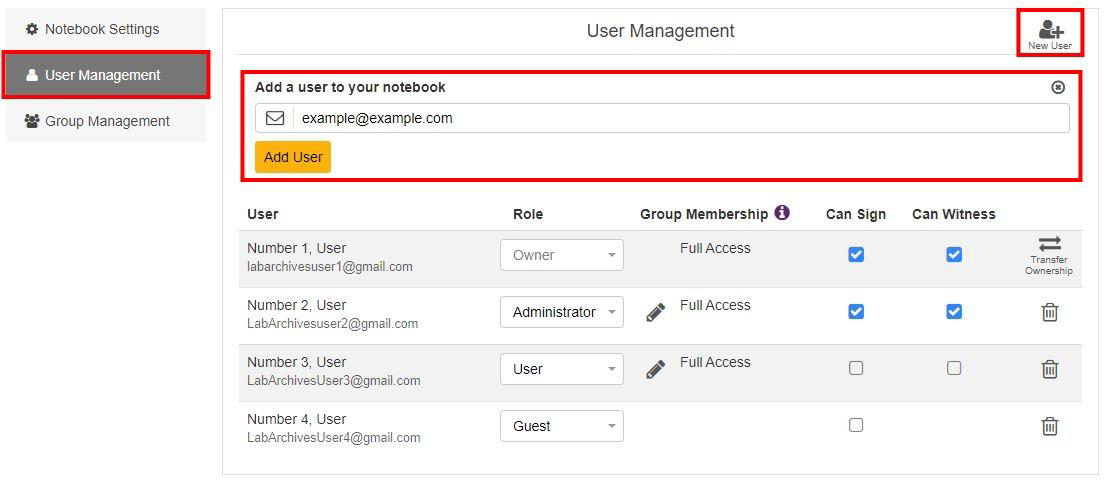
To manage users in the notebook, click the triple dot menu on the top right, select Notebook Settings and go to the User Management tab.
- To add a member, click New User, type in their email address, and click Add User. They will receive an email indicating that you shared content with them. When they login, this notebook will be in view.
- By default, new members are invited as a User. You can modify their membership role through the Role menu and remove access at any time through the Trash can icon.
- Use the Transfer Ownership option to transfer notebooks to another team member. It is not un-common for someone other than the PI or team lead to create the notebooks and then transfer them to the appropriate owner.
- Once you transfer ownership, the former Owner becomes the notebook Administrator. A notebook Administrator can also invite other members to the notebook. Users and Guests do not have access to User Management and cannot invite other members.

Collaborate and Communicate with Your Team
Consider establishing notebook policies and guidelines for how your team will use LabArchives. What type of data will be stored in LabArchives? If there will be data stored outside of LabArchives, where will that data be stored? Do you want data entered in a consistent and standardized way—using a specific notebook structure or page structure? Will you establish a naming convention for pages or attachments in the notebook? Do these questions overwhelm you? Then start small and feel good knowing that you are already taking positive steps towards achieving reproducibility and improving your data management.

You can communicate with other members of your team by adding a comment to an entry. To add a comment, select the Comment bubble on the entry toolbar.
- To alert a specific user, use @mentions. The mentioned user receives an email notification and an activity feed notification about the comment.
- For most entries, when other users are working in an entry you will see a lock indicating that the item is being edited.

Monitor Actions in the Notebook
Every action (deletions, modifications, page signing etc.) in LabArchives is recorded in the revision history and is part of the complete notebook audit trail. As the Notebook Owner, you can easily manage changes made to the notebook using the Activity Feed, Notebook Dashboard, and Advanced Search Feature.

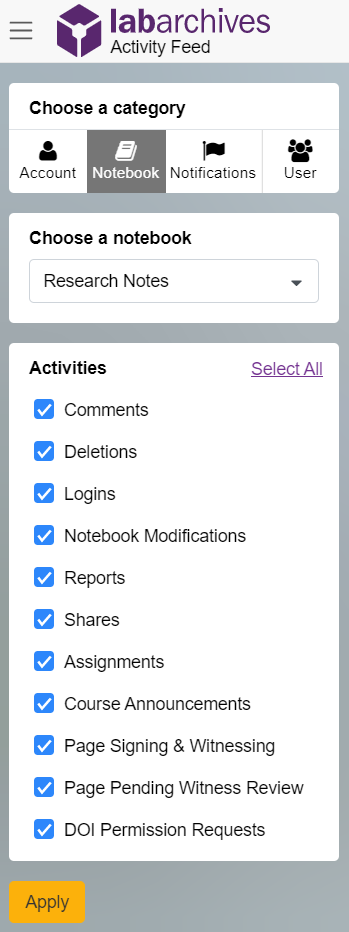
- The activity feed is available by clicking the Bell icon or by selecting Activity Feed in the triple dot menu.
- The activity feed is organized with a system of categories and filters that allow you to monitor specific notebooks or users.
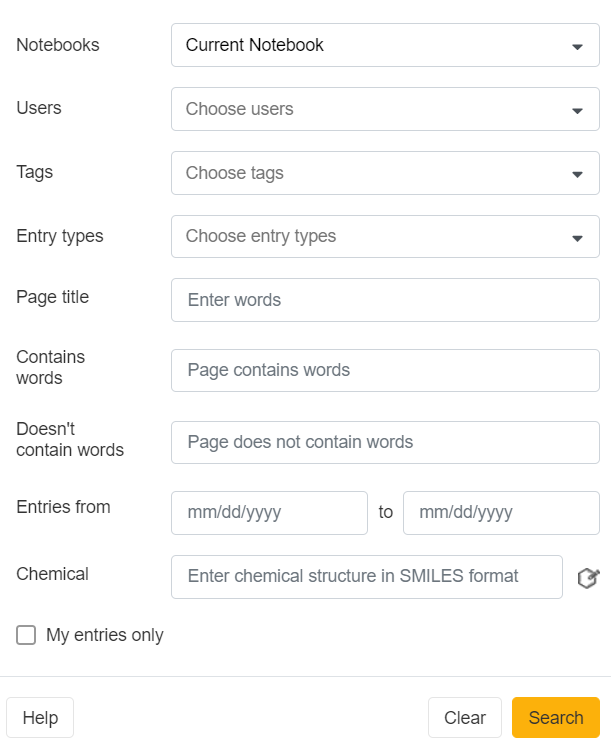
- Expand the search menu to see the Advanced Search options. Search a single notebook or within all the notebooks you are a member of to locate notebook data and monitor projects.
- Search on Tags and other specific fields through the Advanced Search menu. Use Tags as a project-based controlled vocabulary and naming convention that you apply to the contents of your notebook to aid in the discoverability of your data.
- The Notebook Dashboard is accessible by clicking the name of the notebook while it is open. It includes a snapshot view of notebook properties, activities, and users.

